| Table of Contents | ||||
|---|---|---|---|---|
|
Introduction
Unmanaged Jobs cater to the available jobs that are not defined based on dates and shifts (single or multiple) for a particular period. This job period may vary from three months to six months to one year.
...
You can Create Jobs, Edit jobs, Create Job Rosters, and Extend jobs from Unmanaged Jobs.
Video Overview
https://vimeo.com/700666896/3062e16526 Growth Module - Unmanaged Jobs
Wednesday Webinar:
...
How to Access Unmanaged Jobs
To access unmanaged jobs:
Click the Allocations quick link and the Shift Allocations Page opens.
From the Shift Allocations Page, you can Create Job, Edit Job, Create Job Roster, and Extend Job as shown in the figure below.
...
Create Job
To create a new job:
Click Job
→Create Job.The Create Job pop-up window opens. Provide all the required details.
Click Confirm Job Order to confirm the new job order.
Field Name | Description | ||
|---|---|---|---|
Service Location | Service Location of the new job. Based on Service Location selected, the data is refreshed in all the fields. When the Service Location is selected, the Qualification and Delivery Location are uploaded accordingly. | ||
Job Template Name | Job Template Name creates new template of the new job. To create template of the new job, provide the template name in the Job Template Name. To use the existing template, activate ON flag and select the name of the existing template from the drop-down and the Job Order screen gets refreshed. The job order screen populates all the details of the selected template except for the Job Period and Member(s).
| ||
Order # | Order Number of the Job. The order number is either client provided job order number or system generated auto job order number. | ||
Delivery Location | Set Delivery Location options based on the Service Location. | ||
Qualification | Qualification is based on the client’s industry or generic across industries. This is the key factor for selecting members and shift rates. | ||
Expertise | Expertise is based on Qualification. Based on the Expertise, the Finance Dept. obtain the specific rates for the member. | ||
Pay Level | Pay Level is based on Qualification. When the Pay Level is selected, it overrides the member Pay Level during shift confirmation.
| ||
Job Period | To provide Job Order start and end date. By default, on selecting the start date, similar end date gets fetched. Click the calendar icon to set the start date and end date. This Job Period helps to create shift rosters or allocate staff. | ||
Shift Type | Shift Type of the member are shown based on the Service Location selected. The shift rates are calculated based on Shift Type selected. | ||
Job Time | Job Time of the member is automatically selected based on the Shift Type. You can modify the Job Start and End Time. If the start and end time of the shift are not selected, the system will create a 24-hour shift. | ||
Serving Office | Location of the Serving Office. You can change the Serving office of a shift for reporting purposes. | ||
Reference Number | Reference Number is a user-defined number. The payroll history report includes the Reference Number for reporting purposes. | ||
Search & Book Member(s) | Search and select the active members to book for the job order. Only those members are fetched that have the matching qualification and are not booked for any shifts during the specified job period. | ||
Set Casual Availability to Member | By default, Set Casual Availability to Member is activated for the job. The availability to members is set based on the Job Period (start date and end date).
| ||
Choose Shift(s) | When the ON flag is activated for Casual or Permanent availability, Choose Shifts (AM/PM/NS). | ||
Professional Name | Professional Name for the Service Location who has ordered the Shift. You can also type-in the name of the professional. | ||
Authorized Person Name | Authorized Person for the Service Location who is the authorized signatory for the Shift. You can also type-in the name of the authorized person.
| ||
Shift Group | Shift Group is based on the selected Service Location. You can modify the selected Shift Group. | ||
All Shifts under the order will be Sleep Over Shifts? | To activate the ON flag for the Sleep Over Shifts. The Sleep Over Shifts is a booking of 12 hours shift, made up of 8 hours of sleep and 4 hours of additional support before and/or after sleeping. The rate charged for the sleep component of the booking is for the whole 8 hour block (not per hour). This is used by the finance system to calculate the Shift Charges. | ||
All Shifts under the order will have long service leave? | To activate the ON flag for the long service leave. In the Long Service Leave, the employees are entitled to take LSL (Long Service Leave) after a minimum of 7 years' continuous employment. If employment ends after 7 years' for any reason, the employee must be paid any unused LSL entitlement. The amount is to be paid in full on the final day of employment. This is used by the finance system. | ||
Shift Allowances | Activate Shift Allowance ON flag to select the Allowance Types as applicable. The staff selects the allowance as per shift allowance policy applicable to the member. This is used by the finance system. | ||
Finance Notes | Provide Finance Notes for the payroll officer reference. | ||
RatesCalc Quote ID | Provide RatesCalc Quote ID relevant for the job order. This will sync the detail of the quote for the job order.
| ||
Booking Notes | Provide the Booking Notes (if any). | ||
Show to Client | Select the checkbox to show Booking Notes to the Client. | ||
Show to Member | Select the checkbox to show Booking Notes to the Member. |
...
Check Compliance
The Check Compliance assesses the compliance of the member for the Job Order based on the Service Location and Qualification. The Compliance shows whether the selected member is compatible with the selected Service Location.
...
| Info |
|---|
You need to select a single member at a time to check compliance with the Job Order. |
...
Job Template Name
The Job Template Name facilitates to create new Job Order from the existing template. The job template saves time for any new similar recurring job order for which all the parameters for the Service Location are similar.
1. To create a template from the new job order:
In the Job Template Name, provide a new name to the existing Job Order.
Click Confirm Job Order to save the details in a new template.
...
2. To create a job order from the existing template:
Activate the ON flag from the Create Job from existing Template.
All the templates will be listed that are associated with the selected Service Location. From the available templates drop-down, select the required template.
The new job order screen populates all the details of the selected template except for the Job Period and Member(s).
You can create a job order without selecting member(s) and add member(s) later.
...
Update Template
You can update the existing template by adding/modifying the job order details. To update the existing template:
Create a New Job and select the Service Location.
To select the existing template, activate the ON flag for Create Job from existing Template and select the name of the existing template from the drop-down.
The existing job order details are populated except Job Period and Member(s).
Add/Modify the required details in the Job Order and click Update Template (as shown in the figure below). The existing template is updated with the modified details.
...
Create New Template
You can create a new template from the existing template by adding/modifying the job order details. To create a new template:
Create a New Job and select the Service Location.
To open the existing template, activate the ON flag for Create Job from existing Template and select the name of the existing template from the drop-down.
The existing job order details are populated except for the Job Period and Member(s).
Add/Modify the required details in the Job Order.
Provide a new name to the template and click Create New Template (as shown in the figure below). A new Job Order template is created with a new name.
...
Job Rate Card
The Job Rate Card displays the available rate tables for the selected Service Location. You can select the Pay Level for the new job from the Job Rate Card.
...
Click the Job Rate Card for the Create Job screen and the Service Rates pop-up window opens (as shown in the figure below).
The Service Rates displays all the available Pay Level for the selected Service Location.
Now, double-click the required Pay Level, and the confirmation message is displayed ‘Shift Rate has been auto-populated. Press Yes to go to the booking screen’.
Click Yes to continue and the Pay Level details are populated for the new job.
...
Search & Book Member(s)
The Search and Book Member(s) displays the active members who are not booked for any shifts during the specified Job Period for the job. The Active Member(s) listed have the matching qualification for the job.
...
To Search & Book Member(s), it is mandatory to select the Service Location, Qualification, and Job Period for a Job.
Field Name | Description | ||
|---|---|---|---|
ID | ID of the member is linked with the Member Card. On clicking the ID link, the member details are displayed that shows the Skills, Resume, Shift Activities, Availability, Jobs, Notes, and CV Parsed Results. | ||
First Name | First Name of the member is linked with the Member Contact Notes. | ||
On Visa? | The date link provided opens the Employment Details page with the Visa details of the member.
| ||
Legal Check? | The date link provided opens the Employment Details page with Compliance details (Police Check) of the member. | ||
R & R? | The date link provided opens the Employment Details page opens with the R & R details of the member. | ||
Distance (KM) | For the member, the Distance (in KM) is calculated taking into consideration the Service location or Delivery Location of the Job. |
In the Active Member(s) screen, active members who are not booked during the specified job period are displayed.
...
Disabled Members in Active Member(s) List
The member selection checkbox is disabled for a few of the active members due to the following reasons:
...
Finally, click Confirm Job Order, and the Job Confirmation pop-up screen appears.
The confirmation pop-up screen displays the Job Order Period, Qualification, Member Name(s).
To continue with the Job Order, click Yes, Please do and the job order is created successfully with the order number.
The warning message is displayed on the pop-up screen, that ‘Multiple Member Names selection found. This will create multiple Job Orders per member with the same Job Order Details’.
Based on the number of members selected, the job orders for this job will be created.
...
New Job Order in Allocations
In the Allocations Page, new job orders are created based on the number of members selected in the Job Order. In case we have selected seven members for the new job consequently, seven new job orders will be created.
...
Right-click the job order and you can perform Quick Search, Add New Booking, Member Search, Availability, Clear Lock, and Cancel booking functionalities as shown in the figure below.
...
Edit Job
You can edit the existing details of the job. To edit the existing job, select the job:
...
| Note |
|---|
If the Job Rosters have started then the Service Location, Qualification, and Job Period will be in read-only mode and you cannot edit these fields. |
...
Create Job Roster
The Job Roster is used to schedule the days and hours for the member(s) to report for duty. To Create a Job Roster, select the job:
Click Job
→Create Job Roster and Create Job Roster (Timesheets) pop-up window opens.The Job Roster displays the Service Location, Delivery Location, Member Name, Job Start Date, Job Finish Date, Rate Table, Award Pay Group, Client Group, Authorization Name, Job Id, Job Status, Job Rostered, Qualification, and Pay Level of the Member.
In the Timesheet Entry, the details of the member are populated from the Job Order. You can edit the required Timesheet Entry details.
Field Name | Description | ||
|---|---|---|---|
Week Ending | Date of the weekend for the set timesheet frequency. | ||
Timesheet Frequency | The Timesheet Frequency is set in the Finance application. | ||
Approved by Client | Shows whether the timesheet submitted is approved by the client. Here ‘Yes’ indicates that the timesheet is approved by the client and will directly go to Finance application and ‘No’ indicates that the timesheet requires approval and will go to the Client Portal for approval. | ||
Pay Cycle Frequency | Select available Pay Cycle Frequency. The Pay Cycle Frequency available are ‘Monday to Sunday’ and ‘Thursday to Wednesday’. This helps in defining the roster period. | ||
Timesheet Type | Timesheet Type are System Generated, Manual Upload, and No Timesheet (Booked). By default, the System Generated Timesheet is generated. | ||
Attach Timesheet To First Shift Only | Prints all the available shifts in the first shift only. | ||
Upload File | For the Manual Upload Timesheet option, the Upload File option is activated. Click Upload File to upload the file.
| ||
Booking Notes | Booking Notes for the Job Roster (if any). | ||
Roster Dates | Start Date and End Date for the Roster.
| ||
Include Weekend | To include the weekend to the Roster Dates. |
...
Generate Timesheet Schedule
Once all the relevant details are provided in the Job Roster, generate the timesheet schedule for the member. To generate the timesheet schedule:
...
If you have selected Attach Timesheet To First Shift Only checkbox, the timesheet details will be printed in the first shift only (as shown in the figure below).
...
Extend Job
The Extend Job is used to extend the existing job orders. To extend a job order, select the single or multiple Job Orders(s).
...
The Shift log of this Job is also updated with the modification in the Job Order.
...
RatesCalc in Unmanaged Jobs
In Unmanaged Jobs, the RatesCalc facilitates to synchronizes and imports accurate job rates for the job. This feature helps to automate and streamline the payroll processes and ensure rate accuracy, and efficiency for the job using the RatesCalc System (Fairwork Rates Integration Partner).
...
| Note |
|---|
The RaleCalc feature is available in case the RatesCalc flag is On for the client. |
How to Integrate Client with RatesCalc
To integrate clients with RatesCalc:
...
On the Client Details page, click the RatesCalc drop-down as shown in the figure below.
The RatesCalc drop-down shows Create Client, Update Client Id, and View Quotations options.
...
1. Create a Client
In case you need to create a new client in RatesCalc:
...
Now you can view the RatesCalc Integration ID of the client from the Update Client Id.
2. Update Client Id
In case you know the RatesCalc Integration Id:
...
Click Save and the RatesCalc Integration Id is mapped with the Client successfully.
...
3. View Quotation
Once the Client is integrated with the RatesCalc, click View Quotation to view the quotation details in the RatesCalc System.
...
How to Sync Rates with Job Order
To Sync Rates with the Job Order, follow the steps explained below.
...
The Step 2. Review Rates in RatesCalc Format and Step2a. Review Rates in System CSV Format are optional, if required you can download the CSV files of RatesCalc system and Entire OnHire.
To download and review the RatesCalc File, click Review Rates in RatesCalc CSV Format.
To download and review the Entire OnHire Rates File, click Review Rates in System CSV Format.
How to Rectify Sync Errors
Due to missing field mapping details, at times while synchronizing the rates table, the Sync Status can show a sync error for the Job. This indicates that a few additional field mappings are missing either for Pay Items or Job Qualification and are required to be mapped.
...
When the missing field mappings are added, the Sync Status is shown as Sync Successful.
Member App – Unmanaged Jobs
For the Unmanaged Jobs, the member receives Job notifications to submit the roster for the specified schedule. This job notification is visible on the Dashboard screen and displays the Job Period (with a start date and end date), Shift Type, Service Location, Qualification, and Pay Level for the Job.
...
Unmanaged Jobs Roster
On clicking the Job, the Submit Roster screen opens. The Submit Roster screen shows the Job details that include Service Location, Qualification, Pay Level, and duration of the job. You can click the blue icon as shown in the figure below to view the Job Details.
...
The Job Detail shows the Service Location, Delivery Location, Start Time, End Time, Qualification, Expertise, Pay Level, and Member Name.
...
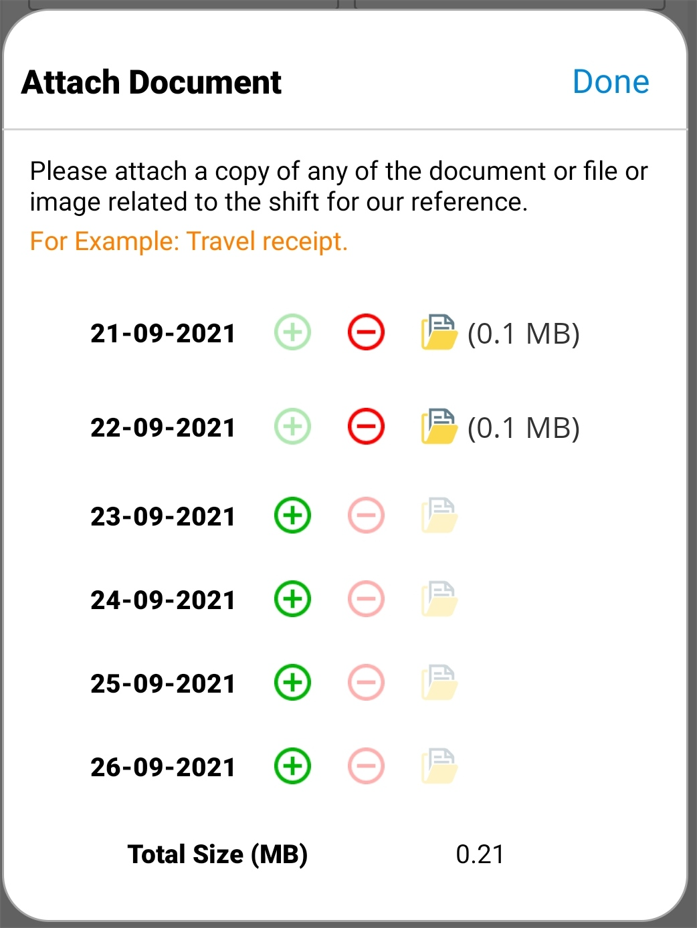
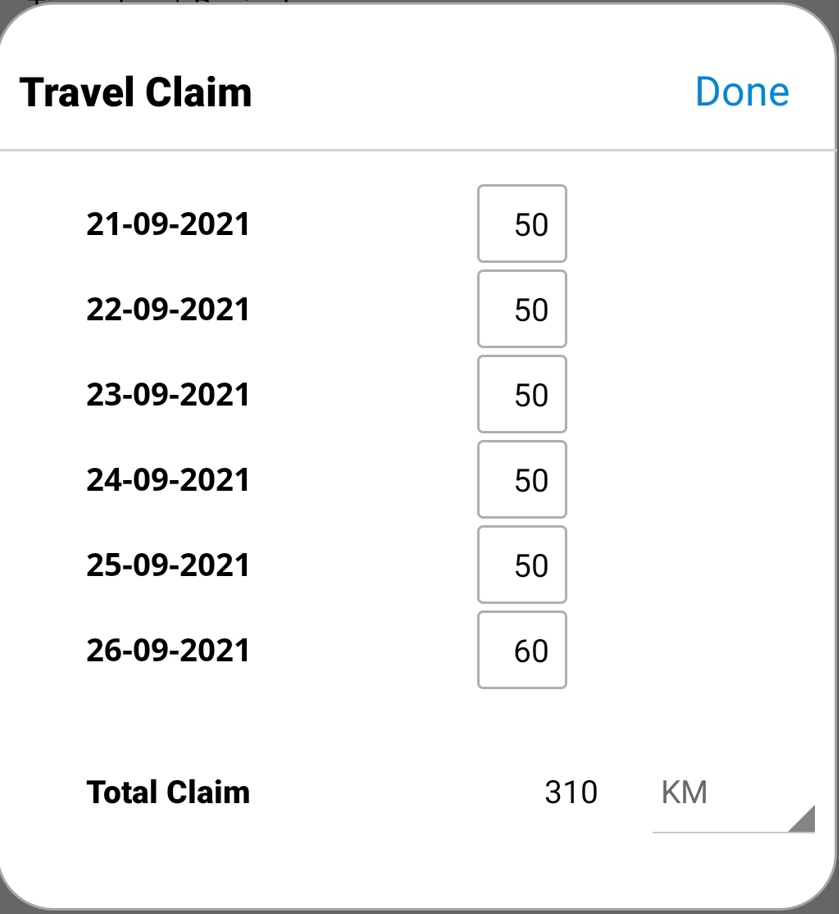
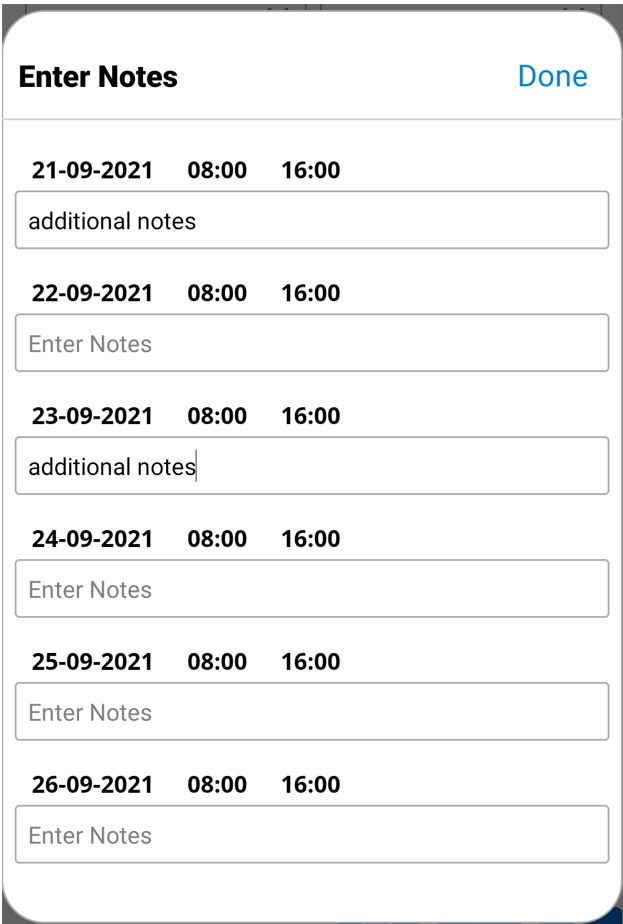
How to Submit Job Roster
Based on the Timesheet Frequency flag set for the Roster, the timesheet schedule is displayed for the member. The Timesheet Frequency can be set to weekly or fortnightly.
...
Once all the details are provided for the Job, click Sign & Submit Timesheet, and the Sign & Submit screen is displayed.
 |  |  |
In the Sign & Submit screen, select Supervisor Name or click the ‘If Supervisor does not exist?’ checkbox to provide the Supervisor Name.
Provide Your Signature and notes (if any) and click Confirm Roster Submission and the ‘Job Order has been successfully rostered’ message appears with the option to View Timesheet.
...
Click View Timesheet to view the submitted timesheet.
...
Alternate Method to Submit Timesheet
You can also submit the timesheet by clicking the Timesheets icon at the bottom of the Dashboard screen and the Timesheet screen opens as shown in the figure below. The Timesheet screen shows the Shifts and Jobs details of the member.
...